Monday, 14 September 2020

Jane on Instagram

Hello everybody!

3 month since my last post! Not only now, but since quite a while I recognise how difficult it is to find or to take the time to sit down at the computer, preparing the pictures and writing a post. 

I searched for a faster posibility of sharing my creations and ideas and as I have been already a while on Instagram for following other creatives, I started a new account: jane_lost_in_ideas

Check it out: https://www.instagram.com/jane_lost_in_ideas/

I'm already very active there. Here is a sneak peak of what I posted there since July:


I would be happy if you visit me there too! 

I don't want to quit this blog completely and probably I will every now and then post something. For example tutorials or bigger projects that need some more explications!

So long,
Jane 

Thursday, 4 June 2020

crawling insects

Yesterday evening scribbling on a test print ...

A bientôt,
Jane 

Monday, 25 May 2020

Wood burning pyrography

Hello, I am back!
I haven't been very creative the last month and I don't want to make a blogpost about sewing endlessly face masks (what kept me busy for some weeks)!

But some days ago, I got a wood burning kit for my birthday and had lots of fun trying that out. After testing on an old piece of wood (we have tons in my husbands workshop) the first real outcome was this flower-candle! The rectangular wood was a test piece too and I had the idea to turn it into a candle, when remembering some wooden flowers I had on stock. 
This one went directly in a parcel I prepared for my dads birthday!
I really liked those flower candles and later made some more:
I tested different burning tips on spatulas. It is not so easy to draw freehand lines as the structure of the wood derails the pyrography pen.
The one with the owl turned out very good. It will become a page marker!
The ones with "thank you" and "merci" on it will become gift tags.
I also made three other page markers:
You can see I really liked the flower burning tip ;-)
With the wooden flowers for the candles I also found some owls and made for those pedestals with fir trees on three sides and footprints on the fourth.
My boys also tested and both made real drawings. Son 1 a hedgehog and a mole and I think the one of son 2 shows an explosion on water. (you can imagine the different caracters of my kids?)


A bientôt,
Jane 

Thursday, 16 April 2020

Template printing easter eggs

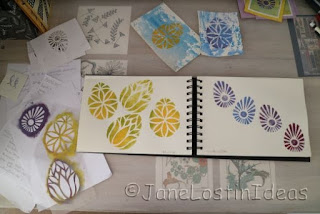
Only Easter monday I got inspired by "Müllerin-Art" who makes great patterns and has a very nice blog, to design egg templates and printing ...
I followed her instructions for the egg templates and cut several first in paper and those 3 I like best I did as well with foil, so the template will be usable much longer.
See on the left the paper version (I put on a colored background to better see it), in the middle the foil template (already after printing) and one print on the right.


The first prints I did in my sketch book, but I found the eggs are a bit boring and lonely on blanc paper, so I looked for some already painted backgrounds and made some more prints. Some I didn't like and some I transformed into cards. Very sorry Easter is over, so I can't use them this year!
 It looked so much like a tulip, that I had to paint a stem
Template printing is so much fun. Since I detected this before Christmas I want to do it all the time!

A bientôt,
Jane 

Sunday, 12 April 2020

Happy Easter at home!


Even if you are not celebrating Easter this year like you do normally, I wish you to have a very happy and sunny weekend with those who can stay close!

Wish you all the best and take care!!

Mes meilleurs vœux et soyez prudent!
Jane 

Saturday, 11 April 2020

Two paper birds

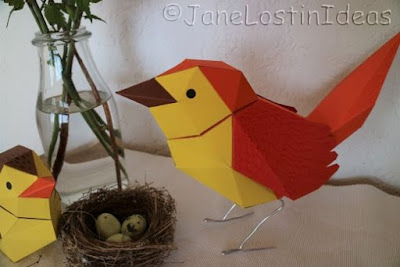
When looking up this paper owl I showed you some weeks ago, I found also this free bird template and as it should be a wren one of my moms the preferred birds, I downloaded immediately the pattern to try. 
I took several print-outs to a crafting-talking-evening with my german girls and we all made one birdie. 
 I should have known before that they can't have the same size like a real wren (would be too fiddly). But for me they are really enormous! Even bigger than a blackbird!
The pattern is good and easy to assemble, the only critique I have is that the tail is visible from beneath, where are the cutting and folding marks and the piece number visible. I glued a paper scrap over it to cover. 
The only difficult (eh, really bothering) step is the feets! Maybe my metallic wire was too thick, but it took ages to install them! This is why the second one is sitting ;-)
In the end I like the couple and send them to my mom! Happy birthday to you! :-)

A bientôt,
Jane 

Saturday, 4 April 2020

Stabilising a bag

A lady of my sewing course wanted to make a bag that's staying upright for easy filling and that is made of waxed cloth. Coincidential I had the same fabric as her only in a different color (result of grouped orders to save shipping fees :-)) So I used mine to make also a bag in the dimentions she wanted. It's 35x15cm and 40cm high. It's not a thick waxed cloth, so not stable enough to stay upright by itself
...as you can see!
Since the "swedish furniture store" stopped producing my absolute favorite canvas that I used for year on many many bags for stabilisation, I haven't found a real alternative jet! I really don't like iron-on stabilisation! My experiences are not so good as it sometimes comes off in parts and then you have kind of bubbles on the surface (but that is only my oppinion, I know that there are many people using it without problems). So for this bag I needed a new solution. I tried out Style-Vil from Vlieseline! It is quite thick and maybe a bit too much for a simple bag like this. First, I only wanted to use it on the small sides and the bottom of the lining, but it still fell to the middle so I added a bizarr looking stripe on the upper edge of the lining.
Kind of funny looking inner bag! The style-Vil isn't glueing. I added it with some wide quilted meanders (and added one or two flowers for fun).
This is how the finished bad looks like.
Staying upright like wanted, but for me it's a bit too much case and not really a bag. Need to see what my student says (when the confinement time is over one day). This won't be a technique I will use again, but I am quite impressed with the style-Vil that's really strong though soft in handling and easy to sew!

A bientôt,
Jane

Tuesday, 31 March 2020

Blue phase

I announced to show more spinning art in the last post (I still have some pictures I didn't show jet - they will come later), but the addiction to the electric screw-driver took a pause and I fell again in love of painting stones like last summer (look here and here). And it seems that I am in a blue period ;-)
Ahh, I really love those. Not one that I dislike!
But I made also two with a little spring color on it:
Only a small photo to not spoil my blue post :-)

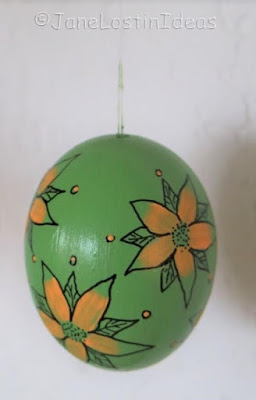
From painting stones I jumped over to painting eggs (more difficult and less accurate!)

But I think the blue/white phase is over now and I will be back to multi-color soon!

A bientôt,
Jane

Tuesday, 24 March 2020

Drawing with rotating paper

Last week (first week at home with Corona-restrictions) I saw this little video at pinterest and tested it the same evening with younger son. SO MUCH FUN !
We immediately produced a dozen circles!

I made a colorweel and glued it to the pen box of elder sons pencils (bizar: he is the only one in the house having normal pencils - I have only fine liners)

The following days I had to think of what to do with all those circles.
First I tried a paper patchwork!
The last one made it into my sketch book.

Of course I had to share this with all crafting addicted people I know with photos over portable phone. The idea of my sister in law was to draw on both sides and make them into a mobile. 
Done!

The other circles I assembled as a collage on a black card stock.
I was already a bit tired of this horse collage, so I replaced it with the circles. Funnily I now see a soaring elephant (am I crazy??)

Then my darling had a genious improvement for fixing the paper on the electric screwdriver: He gave me a metal pin to fix in the drill chuck and a little but strong magnet to hold the paper. So now no more holes in the paper and I now make multiple excentric circles!


If you are also at home with lots of time because you can't work or you need to entertain you kids: try it! There are probably endless possibilities for what you can do with those circles. I will show some more in the next post!

Take care!
Soyez prudent,
Jane 

Wednesday, 18 March 2020

Crazy tote-bag - bag-sewing 5/2020

Initially I only wanted to make an example of "patch-as-you-go" to show my students that seams are stabilizing even soft fabrics a lot. This is why the backside is molleton. Later I wished I had taken two layers or something more stable, because it was so much fun sewing with all this scraps and I wanted it to make a real project and not only an example.
(click for bigger view)
Isn't it gorgeous! I love it! 
The piece is about 42x110cm.
The crazy scraps are built around some left-over blogs I had. You can see a pinwheel, two flying geese, 4 blocks of 9patch and a zig-zag-piece.
Most fabrics are only once in the whole patchwork! I only used scraps! I didn't cut any pieces from a bigger fabric than 20x20cm. Funnily my scrap drawer isn't much emptier ... need to make some more of those projects ;-)

I transformed it into a tote-bag! 
Looking different from every angle :-)


I'll do another one and this time directly on a stiffer support than molleton, so I can spare the linning. Here I used the most stable cotton canvas I had to give enough stability.
The bottom is made the same way as for my stripy-totes.

Do you like it too? Need to start very soon with the next one!

A bientôt,
Jane