Wednesday 28 March 2018

Tags from shrinking foil

Since some weeks I am crafting little tags with shrinking foil. I found it by chance in our local supermarket that is normally not especially equipped with crafting material. I've never heard about "magic shrinking foil" so I bought one package to try. It works great!
You draw with water resistant pens or color pencils on the foil, cut it in shape and then you bake it for about 20 seconds in the oven. It first gets wavy with the heat, but when you see it flattens again, it is ready and about 60% smaller than before and much more fat. Lots of fun.
Here you can see the original size and the finished shrunken tag. The beginning circle is 5cm in diameter and the end product 2,2cm. Stupid me, I took a photo of a round circle with a tag, that I made from a circle with wavy borders. But the sizes are the same.

This are some of my creations. 
The flower one is my first try. I didn't made a hole in it before baking, so I have to find how to use it. Since I punch always holes, so they can be used as little tags.
Those I draw with a permanent black marker.
Not all are round, with the scraps of the foil I made little asymmetric tags. I love the middle one! Wouldn't it be a cute detail on a pouch?
With some of the silver and black colored tags I have a little problem. As you can see they seem to be dirty, but you can't get it off. I don't know how this happened, because I can't remember them being dirty before the baking.
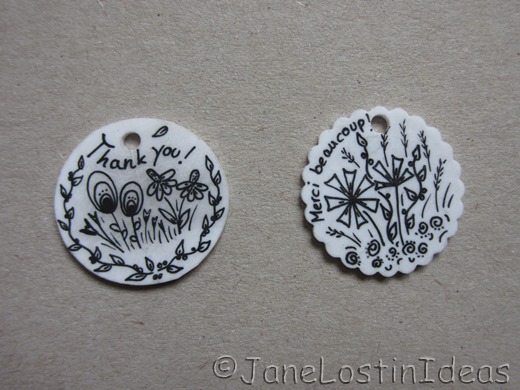
Here I used one tag for a little "thank you"!
Black marker colored with pencils!
One of those I already used as a gift tag for a birthday present:
You remember the present? It's one of my scrappy baskets!
And a little landscape!

I like to make this little drawings. On my desk there are now always some foil pieces and when I have a minute to relax I draw some flowers (mainly flowers). I also made some with names on, for kids to mark their pencil cases! I think there are lots of possibilities to use those tags and I am happy I found out about shrinking foil!

A bientôt,
Jane

Saturday 24 March 2018

Paper Bunnies for Easter

Today I tried out some origami paper rabbits to add to my Easter decoration. I found all kind of instructions on Pinterest and tried four! 
We had great sunshine today, so I could take the photos in the garden, but of cause the bunnies are for inside! (I just hope to have this kind of weather also next weekend for Easter!)

Number 1:
I thought it's funny that you have to blow up the body and compared to the others this one was the easiest, but I don't like the flat face and that the body is directly attached to the face. So, I won't make any more of those.
Here is where I followed the Instructions (and no, I don't understand Dutch ;-)

Number 2:
This one you can fill with little chocolate eggs or other sweets and I thought it might be nice as little Easter gifts, but again I am not so happy with the head. I think the nose isn't really visible. 
You can find the instructions to this one here!

Number 3 and 4:
Those two rabbits are not rose! They both have a light brown color, but somehow the camera didn't get it.
The results are quite similar, but the making is different. It might be because of the video (you'll find it here), but I managed number 4 (the one with the dots) better. 
For number 3 the bottom is originally going in one line down to the ground. After making number 4 I added the last step and folded the edges in, to have a pointy bottom as well. But it might be that I didn't follow the instructions (look here) correctly: they had been in Chinese ;-)

Conclusion:
I like the last one best. He is the winner and will get a place in my Easter decoration and maybe some friends alike to play with! :-)

A bientôt,
Jane

Thursday 8 March 2018

Tunic in green

It has been a while since I dare to sew a piece of clothes for me. There are two reasons: clothes need a lot of fabric and I fear that the result isn't wearable and I have to throw fabric away (horrible thought).
I am tall and have very long arms and legs. That are the main problems to find fitting clothes in stores and also to find patterns for sewing. I normally have to modify a pattern and it's not done with only adding 10cm in length. But as I fear to ruin the fabric (see above) I hesitate to modify patterns. A horrible circle!
But this don't stop me from buying from time to time fabric that I can already imagine as a top for me. Then it gets in my stack and getting old there :-) But now I saved one fabric from the cupboard and transformed it in some kind of a tunic.
I took a pattern I once took from a good fitting under-shirt and changed it a bit. The important for me had been to have the shoulder-sleeve connection right. The sleeves are double to have the effect of a long sleeve under a T-shirt sleeve. They are fixed together on the shoulder seam.
 
The length of the short sleeves had been initially as long as the top part of the tunic above the dark stripe. But I had to shorten the top part as it had been too long and I didn't feel like opening up the sleeves again as well.
The neckline is simply doubled. I feared that step, because I hate when the hem is getting wavy, but it worked perfectly in the first go.
All together I am very happy with my new top. I would have liked to have another pattern to start with, but it worked not bad and I think the result is somewhat wearable :-) It is very narrow fitting on the sleeves and shoulders, as the pattern had been for a shirt that is to wear under other things. I can't wear much under my tunic, so it is not made for cold winter days, but I can already feel the spring coming, and then it will be perfect. 

A bientôt,
Jane

linked at: RUMS (german blog-party for stuff you made only for yourself)

Friday 2 March 2018

Tutorial - scrappy basket

Finally here comes the promised tutorial for my scrappy baskets and bags! Those are great to use up lots of scraps. See all of my bags and baskets I made with this technic here, here and here
And now I'll get started with lots of photos and explanations: